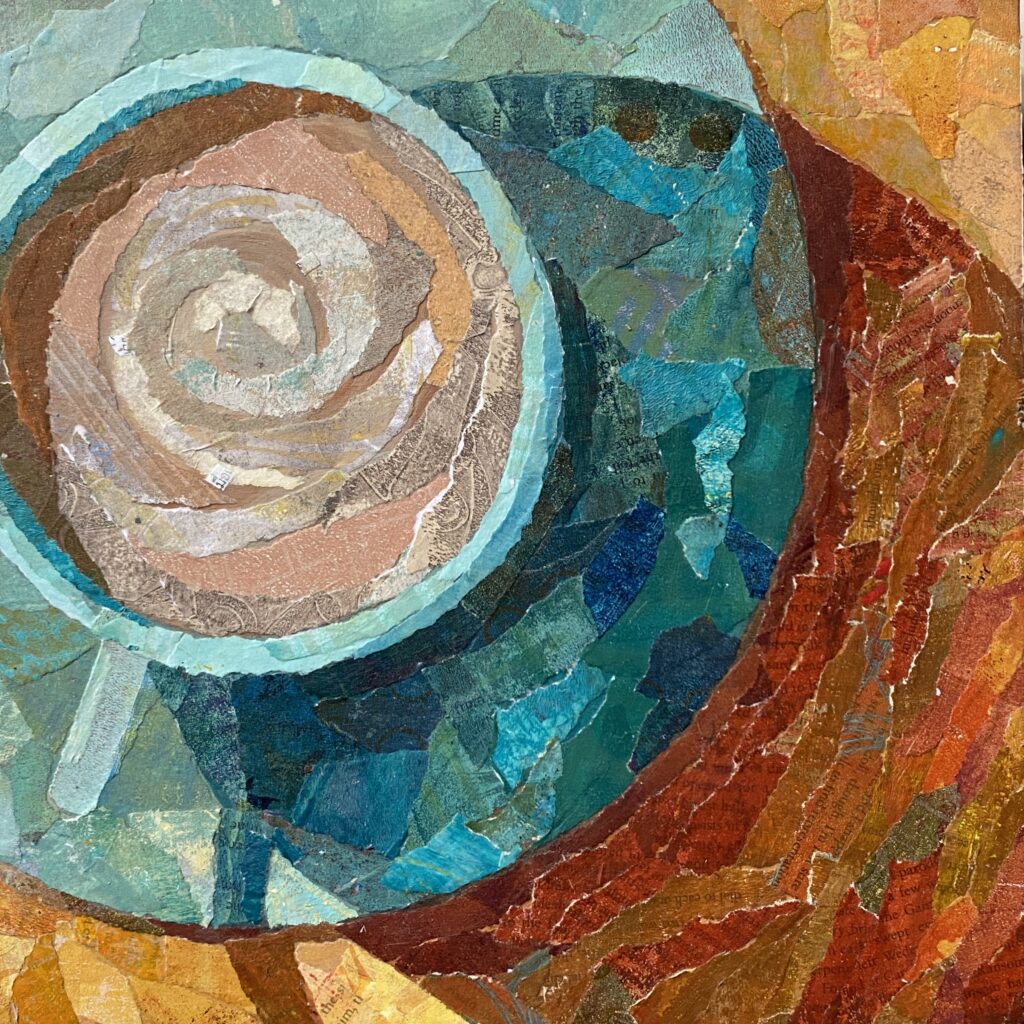
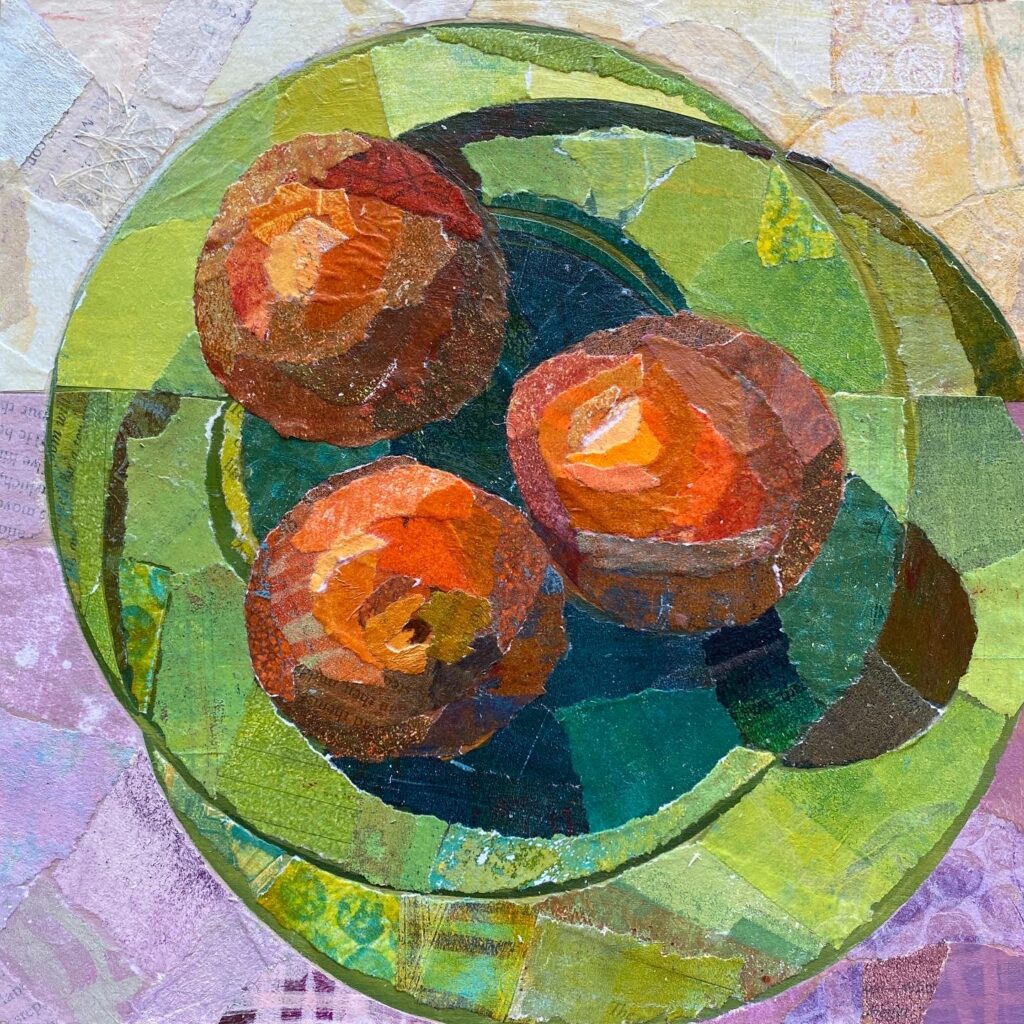
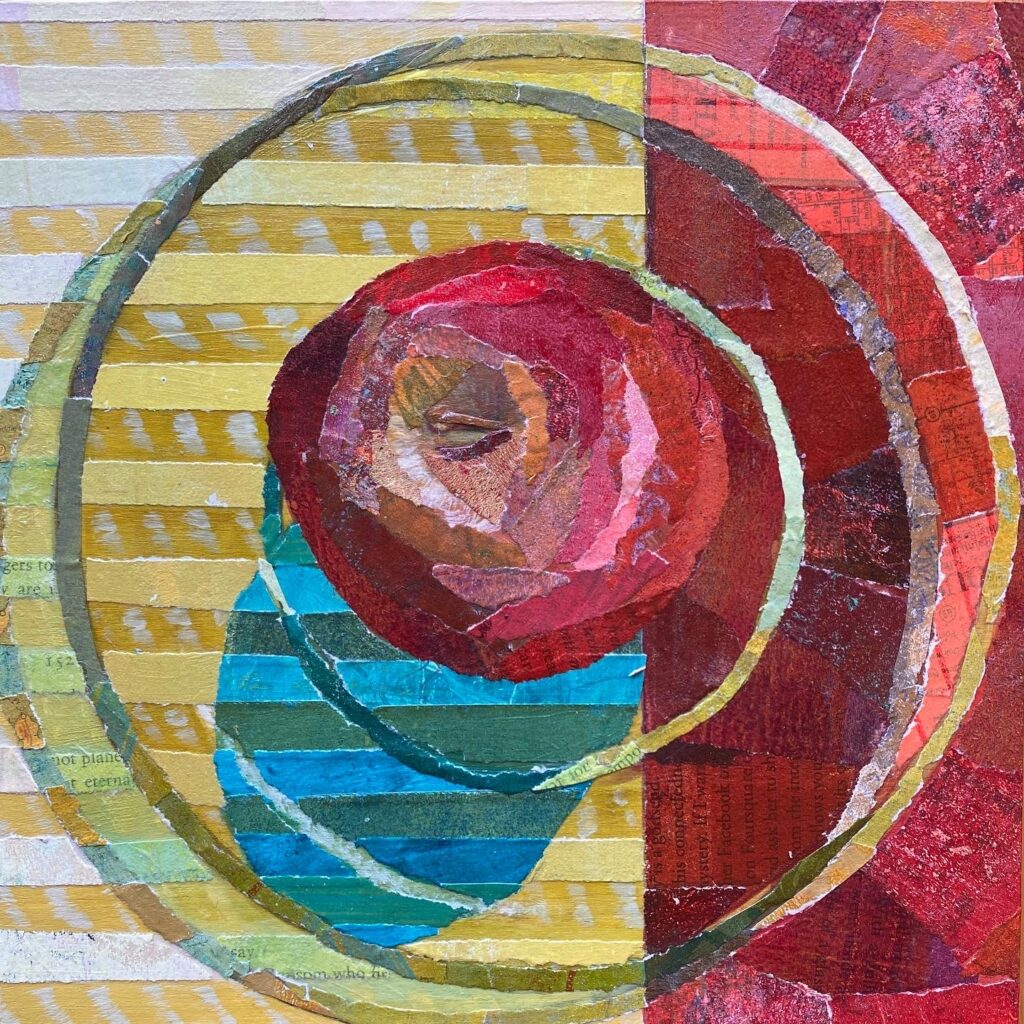
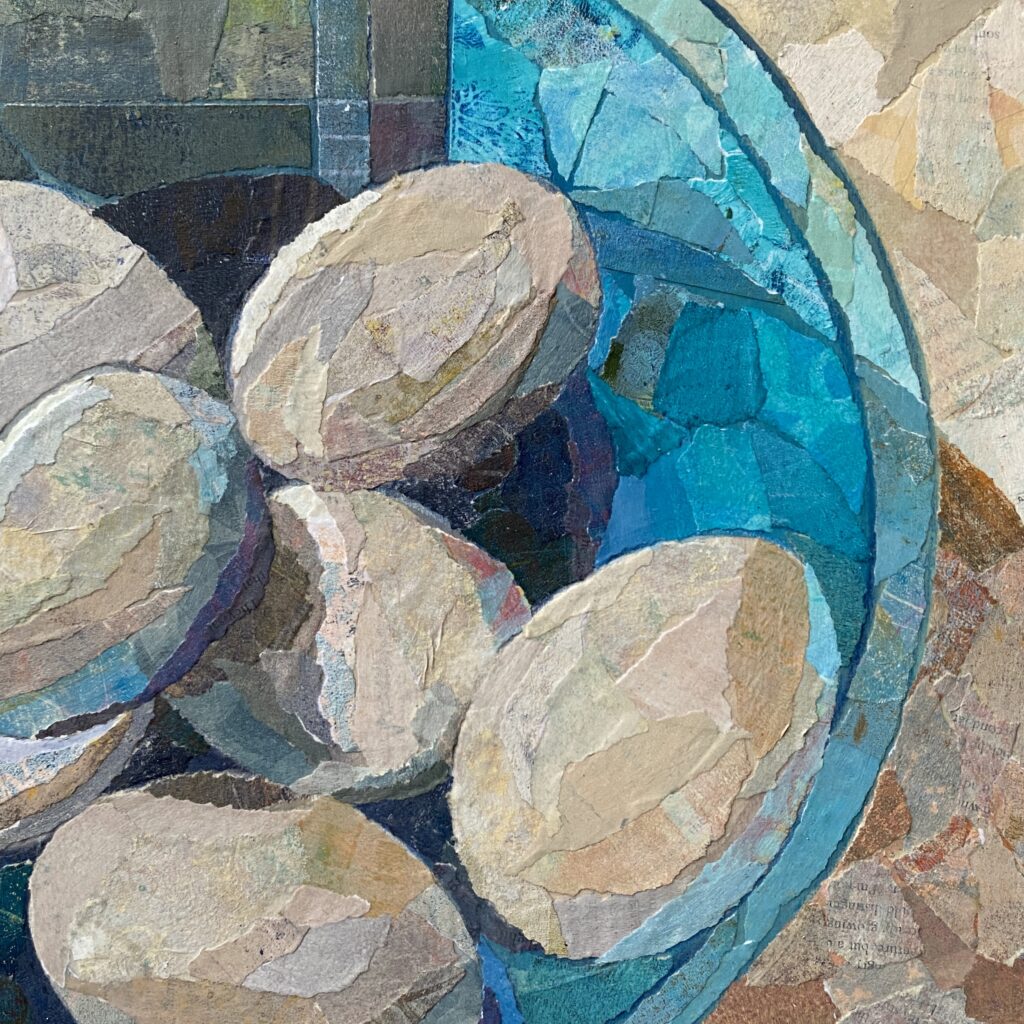
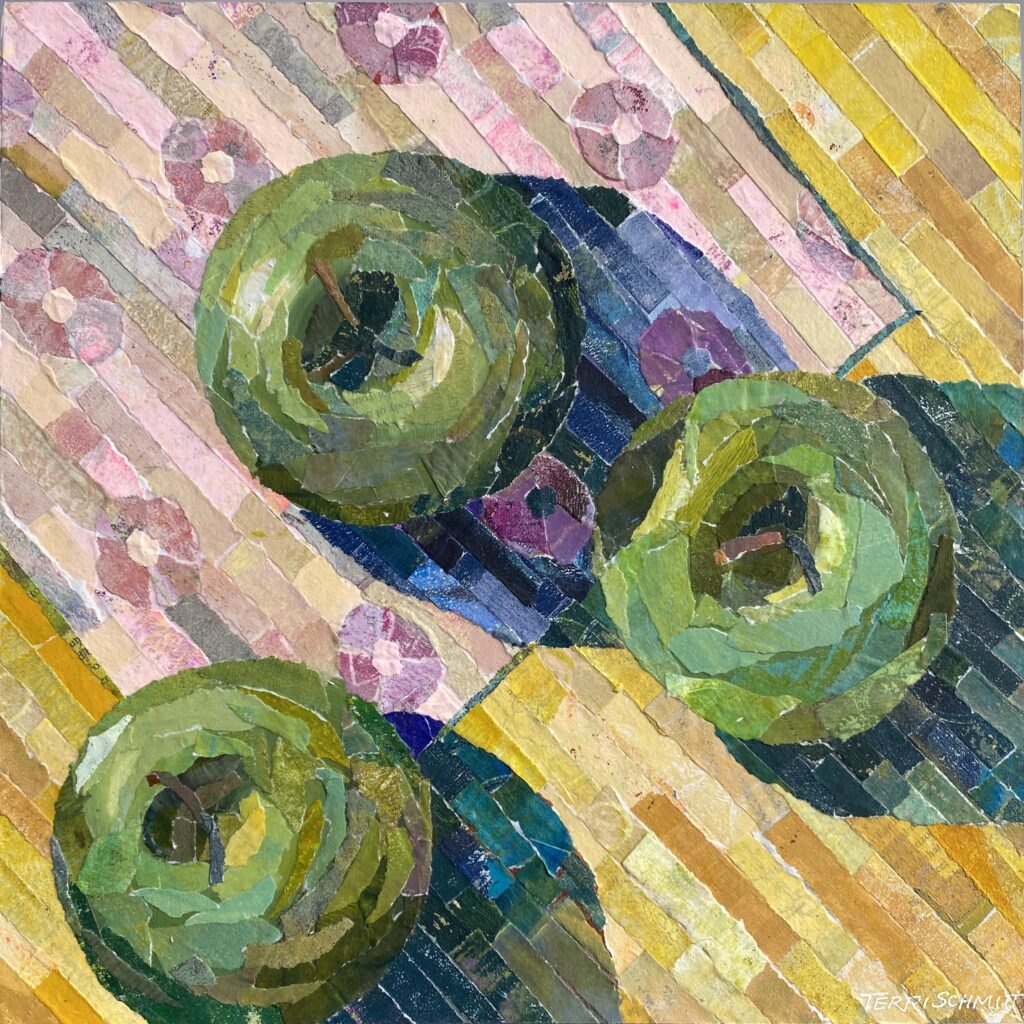

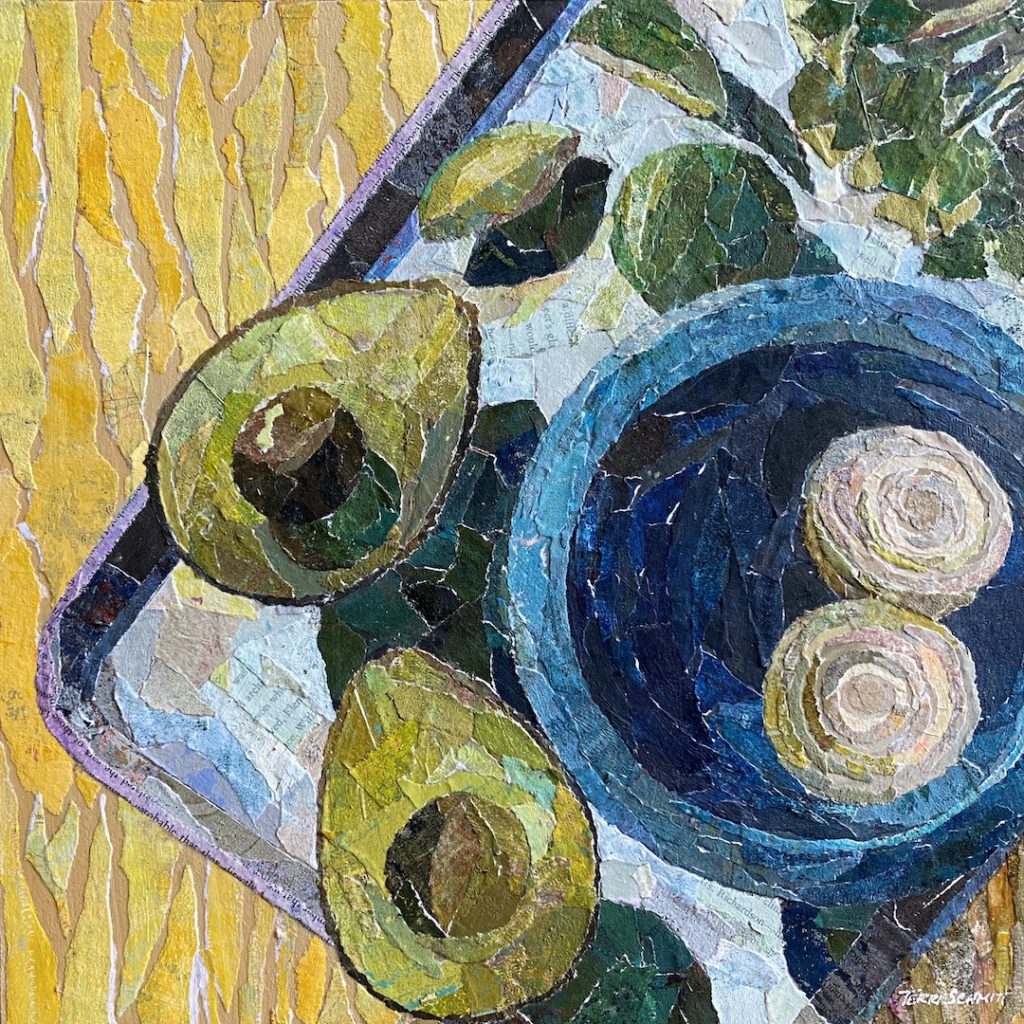
Most of my recent work has involved making still-life paintings of fruits, vegetables and flowers. I paint them from a top-down perspective and am interested in showing intense shadows and exploring the color of those shadows. When I can include a translucent plate, bowl or vase in the composition, I get even more excited about how the color of these vessels influences the appearance of the objects and their shadows. In 2020, I was doing these paintings in oil and cold wax. You can see them here. Then I got introduced to gelli-plate printing and the making of hand-painted papers, and the world of color opened up to me in a whole new way. For the last two years, I have been making these paintings using a new medium, these are what I call Torn-Paper Paintings.
You can see these paintings in the image gallery above. Some of these pieces are available for sale in my online SHOP.
I would like to give credit to Elizabeth St. Hilaire because she is a very generous teacher and over the last few years, I have learned a great deal from her. Her books, especially Painted Paper Art Workshop, are really great. Her website is phenomenal. Just this past month, I ventured to Sedona, Arizona to take an amazing workshop with her. She is an amazing human being!
In 2021, I was asked to give a presentation to the Woman’s Art Club of Cincinnati, where I demonstrated this technique. The video below is something that I prepared for that presentation, and it shows a lot of the techniques that I use.
Paintings Made of Painted Paper
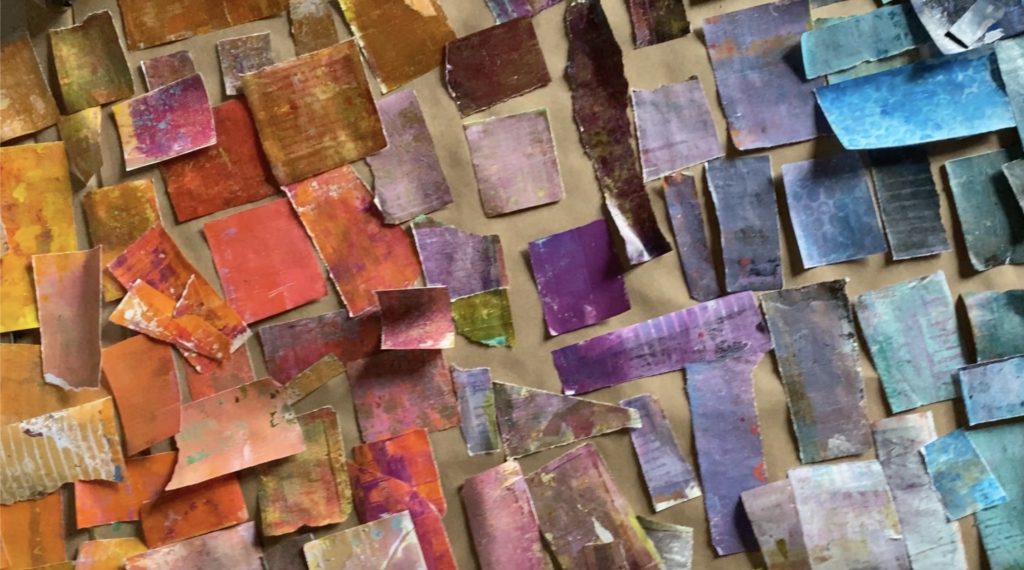
My torn-paper collage paintings are made using many techniques. I was asked to share my process recently, and thought you might like to see how I do this. I make art papers using a gel printing plate and acrylic paint. These art papers are one-of-a-kind creations that I tear up and use like paint on a canvas. I strategically use subtle color shifts that are part of the painted papers when placing them in the finished painting. The torn paper is used like strokes of paint on a wood panel. The result is a painting with lots of depth and character, a finished piece that is like a mosaic with wildly creative use of color that your eye mixes as it looks at the picture.
The Process
The painting process includes 4 main steps: creating a roadmap, painting a bunch of beautiful papers, choosing your hues, and assembling the finished painting onto a wood panel.
1. Roadmap (VIDEO 2:26)
- Prepare a wooden panel by painting sides and surface with clear gesso
- Create a strong compositional design and make a small value sketch in pencil
- Transfer your drawing to the primed wood panel, and
- Paint with acrylic, using color to indicate background, form, highlights and shadows
- This underpainting is your road map

2. Painted Paper (VIDEO 3:25)
- Light solid color layers 3:53, 4:23
- Squirt out about a nickel sized dollop of light colored paint (or combination of paint) onto gelli plate
- Stir and roll out evenly with brayer
- Press paper into the plate and pull print, lay flat to dry
- Repeat several times with tints of various hues, start out with light colors
- Make a solid gradient layer 4:34
- Stencil prints and ghost prints 4:54
- Roll out a subtle contrasting paint color
- Place a stencil over the plate
- Press a light colored painted sheet face down on the plate and pull print, hang to dry
- Lift stencil and use a second prepainted piece of paper to make a “ghost print” with the paint that was covered by the stencil
- Stamps and Textures 5:34, 6:07
- Roll out subtle contrasting hues and values
- Use stamps to create a pattern in the wet paint on the plate
- Place paper face down on the plate, pull print, hang to dry
- Use multiple colors of paint on the plate, mix and flatten them out for gradations
- Make more patterns and textures using soap bubbles 7:00, alcohol dropper 7:28, random textures like combs, cookie cutters or other objects to create pattern
3. Color Palette (VIDEO 7:45)
- Separate papers by hue, white, gray, dark
- Use a sharp edged ruler to trim off white edges and separate the variations of each hue
- Label a set of gallon-sized zip lock bags and organize your stash
4. Torn-Paper Painting (VIDEO 8:30)
- Now it is time to assemble a painting from your torn papers
- Find the background areas where things are farthest back from the picture plane.
- What colors are in that area? Select some colors from your stash and lay them next to the painting. Give yourself a variety of tints and shades (a wide range of values), and think about muted colors vs. pure hues. What are the local colors, highlight colors and shadow colors?
- Then choose an area to begin, like a corner where the edge of an object meets the horizon line
- Study the hue and value of the color in that area and choose a colored piece of paper
- Hold up that piece of paper and audition it against the roadmap of your painting, does it disappear into the roadmap?
- Tear the paper into an approximate shape of that intersection, not exact, just a rough shape
- Apply matte medium to your brush, then onto the panel
- Now lay your roughly torn piece of paper into place, you can move it around until it dries
- Press the painted paper into place around all of the edges, and over the top, applying pressure with your brush
- Then apply a thin coat of medium over the top of the paper to seal it into place
- Continue tearing and laying in the paper until you have the background covered
- When you get to the edge of your picture plane, always leave a small amount of paper running off the edges of your panel. Leave these little pieces loose.
- Allow the painting to dry completely
- Once the painting is completely dry, then trim off the rough edges with a sharp knife to reveal a nice, straight, clean edge
- Cover the top and sides of the painting with another layer of matte medium
Supplies (VIDEO 0:51)
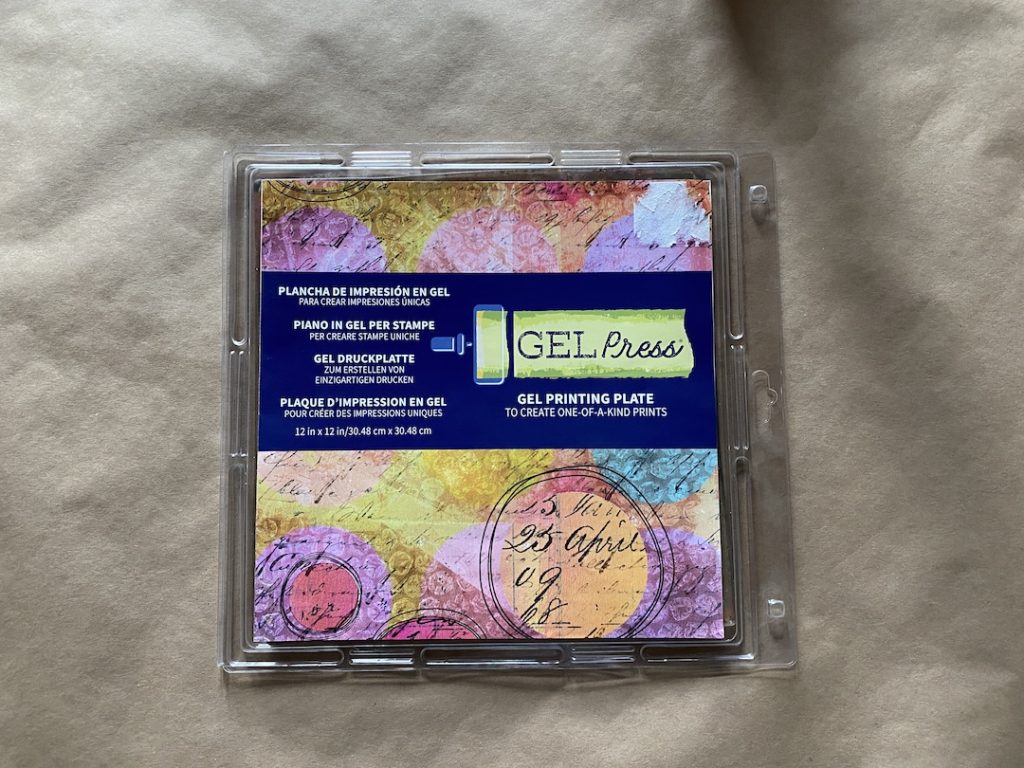
- gel printing plate
Gel Press Gel Printing Plate (12×12 or 8×10)
https://gelpress.com - acrylic paints
Master’s Touch Fine Art Studio Acrylic
https://www.hobbylobby.com/Art-Supplies/Painting-Supplies/Acrylic-Painting/Red-Ochre-Master’s-Touch-Acrylic-Paint—4.1-Ounce/p/8395
Golden Fluid Acrylics
https://goldenpaints.com/products/colors/fluid - Speedball 4” Pop-In Brayer (hard rubber or acrylic)
https://www.speedballart.com/our-product-lines/speedball-printmaking/speedball-blockrelief-printing/speedball-block-printing-tools-accessories/speedball-brayers/ - Purchased and found paper: thin paper, rice paper, deli paper, old maps, books, sheet music (nothing shiny) Yasutomo Hosho Paper Pad, 9 X 12 inches
https://www.amazon.com/dp/B0024KUC84?ref=exp_paper-paintings-collage-artwork_dp_vv_d - stencils and masks 1:25
https://www.joggles.com/stencils/joggles-elizabeth-st-hilaire-stencils-and-masks - foam stamps
https://www.joggles.com/rubber-stamps/joggles-elizabeth-st-hilaire-foam-stamps - wooden panels
Art Alternatives 8×8 cradled panel
https://www.plazaart.com/wood-panel-1-5in-cradled-super-value-5-pack-8×8 - gesso
Liquitex Professional Clear Gesso
https://www.dickblick.com/items/liquitex-acrylic-gesso-clear-16-oz-bottle/ - matte gel
Liquitex Professional Acrylic Medium, Matte Gel
https://www.jerrysartarama.com/liquitex-acrylic-gel-mediums?gclid=CjwKCAjw7–KBhAMEiwAxfpkWD0lVHHKnJ9e-X70Ff-pgEq6Rp5BpQWgHG8WBXpILxGaWLmsPzCJNRoCL_kQAvD_BwE - old flat or filbert brushes
- cutting mat
Fiskars 12×18
https://www.fiskars.com/en-us/crafting-and-sewing/products/rotary-cutters-mats-and-rulers/self-healing-cutting-mat-small-12-x-18-12-83707097j - sharp knife (box cutter or X-Acto)
https://www.dickblick.com/products/x-acto-x3000-knife/?clickTracking=true&wmcp=pla&wmcid=items&wmckw=57536-2050&gclid=CjwKCAjw7–KBhAMEiwAxfpkWFkr5Tq1ri55zaYSsBoyy2nnJKS2UZG7EDIsdCXAG1MTjM7D3rKZ8hoCWDUQAvD_BwE
Tips:
Gel Plate
- Keep the clam-shell packaging for storing the gel plate (I lost mine and had to order an empty clamshell. Then I located the original one, so now I have two!)
- Store the plate flat, in its clamshell, do not place anything heavy on top of it
Printing the Paper
- When printing your art papers, work quickly
- Everything prints backward, stamps, handwriting, stencils
- If you have a fan turned on in the room, your paint may dry faster than is optimal
- If you use a lot of glazing medium to make your colors more transparent, the papers will have a tendency to stick together. No amount of drying will eliminate this. But you can often pull them apart without much damage. The paint film strengthens the paper.
- Transparent colors are great, including zinc white
- When mixing color for your papers, mix the paint on the gel plate using a brayer to stir it up, or mix your paint on a palette and transfer the mixed color with a palette knife
- Set up a little “clothes-line” with clips to hang papers to dry
- When papers are dry, use a metal ruler to quickly trim and separate the different hues
- The paper feels precious at first, but it is not. Just tear it up and organize your palette.
- Trade paper with your friends for more variation in your paintings!
Paint and Mediums
- I like to use both Master’s Touch Fine Art Studio Acrylic colors and Golden Fluid Acrylics. The first one is light-medium body and comes in tubes with lids that snap shut. The second comes in bottles that also have snapping lids. Liquitex basic is good consistency, but not highest quality pigment
- Heavy bodied paints are difficult to move around on the gel plate, they leave big shapes in your prints.
- Tubes with screw-on lids are cumbersome to reattach properly, the snap lids are faster.
- Start with full coverage of light colors, adding layers over the top of light colors, building intensity
- Think subtle contrast in color when you layer
- Fluid acrylics dry fast and if you roll them too much, they will pull off of the gel plate and stick to the brayer, which is a waste of paint
- Transparent colors from Golden create amazing color combinations when layered: I like to use zinc white, quinacridone magenta, quinacridone nickel azo gold, turquois phthalo and indian yellow hue
- A little phthalo green or blue goes a long way!
- I like to have a few light bodied pale colors like master’s touch dark titanium white, and ocean green, also liquitex basics iridescent graphite is nice to darken a printing plate
Tearing and Adhering paper
- Tear the paper shapes toward you for fewer white edges, tear the paper away from you for white edges
- Leave space around each piece of paper, or shingle them on top of one another
- You can refine an edge later when you tear the paper for objects that are forward in the picture plane
- If you have to remove a paper from the painting, the painted layer may come off and leave a thin layer of paper. This can be removed with a little water on a clean brush or it can be covered over with another piece of torn paper.
- Apply the matte medium to the wood panel in a moderate layer, then place the torn paper onto the matte medium, pressing down with the brush.
- Remember to cover the newly placed painted paper with more matte medium.
- Start with the background areas first, things farthest back in the picture plane. Move to the next closest item until you get to the items in the front, which you will do last. For instance, tabletop, napkin, bowl, fruit in the bowl
Clean-Up
- Use white or gloss medium to lift old paint from gel plate
- Use extra strength packing tape to remove old paint from plate
- Don’t worry about cleaning your brayer after each color, wipe the color off of the brayer onto an extra sheet of paper, then use it again
- The paper that you use to clean your brayer can be really beautiful as a base layer for another painted paper!
- I disassemble my pop-in brayers to clean them
- Use the blue Scott sponges with the white dots to clean brayers or soak the roller in Murphy’s Oil Soap
- Hold onto small pieces of color, you never know when you may want it. But don’t make yourself crazy saving every last scrap!